
Tools
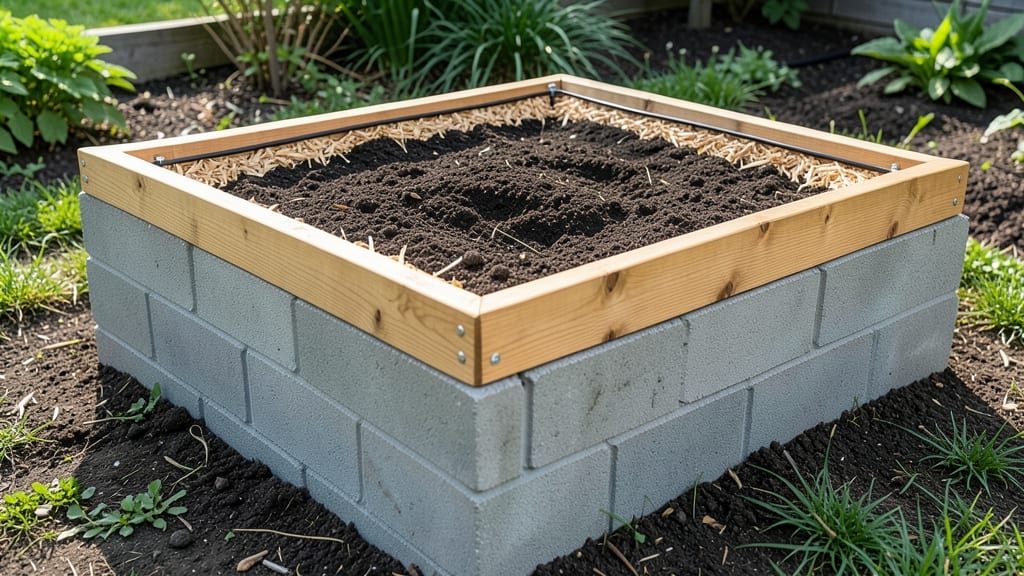
Building a raised garden bed with cinder blocks and wood gives you durable, customizable growing space that lasts for years. 🌱 I’ve used this method to create beds that stay sturdy through heavy rains and freeze-thaws, while keeping soil quality exactly where I want it—no more battling weeds or compacted ground.
The beauty of this combo is that cinder blocks handle the weight and drainage while wood keeps the look warm and inviting. You’ll find it’s easier to maintain than traditional in-ground gardens, and the height makes tending to plants a breeze—no more bending over for hours.
Plus, the blocks let you adjust the shape to fit awkward corners or small spaces perfectly. Once built, these beds transform into productive, low-maintenance growing zones. Your plants will thrive in well-draining soil, and you’ll spend less time weeding while enjoying better harvests. The best part?
You can start small and expand as your gardening confidence grows. This method works for everything from herbs and veggies to flowers, and it’s budget-friendly too. Let’s walk through exactly how to make it happen—no fancy tools required.
📚 In This Guide
- What you need
- Instructions
- Tips and common mistakes
- Wrapping up and next steps
What you need
- ● Cinder blocks (concrete blocks) – 8–12 blocks (depending on bed size; standard 16" x 8" x 8" blocks work well). Tip: Use interlocking cinder blocks for extra stability!
- ● Untreated or cedar wood – 1–2 boards (2x6 or 2x8, cut to fit your bed dimensions; cedar resists rot best).
- ● Landscape fabric – 1 roll (to line the bed and block weeds).
- ● Garden soil or compost mix – Enough to fill your bed (aim for 6–12 inches deep for most plants).
- ● Gravel or small rocks – 1–2 bags (for drainage at the bottom).
- ● Measuring tape – For precise bed dimensions.
- ● Level – Ensures your bed stays even (no wobbly plants!).
- ● Screwdriver or drill – To secure wood corners (if using screws).
- ○ Screws or corner braces – 4–6 pieces (optional but recommended for wood stability).
- ● Wheelbarrow or shovel – For moving soil and gravel.
- ● Work gloves – Because cinder blocks are heavy and soil gets messy!
- ● Wood stain or sealant – To protect your wood from weather.
- ● Drip irrigation kit – For low-maintenance watering.
- ● Edging material (landscape timbers or metal) – For a polished look.
- ● Mulch – To retain moisture and suppress weeds.
Step-by-step instructions for building a durable raised garden bed
Here's how to create a sturdy, long-lasting raised bed using cinder blocks and wood—my go-to method for years.
🪴 Step 1: Plan and Measure Your Bed Layout
Start by deciding on your bed's dimensions. I recommend a 4-foot-wide by 8-foot-long bed for easy reach from both sides—this avoids stepping on the soil and keeps plants accessible. Sketch your design on paper first to visualize how the cinder blocks will form the corners and edges.
Use a tape measure to mark the perimeter of your bed on the ground. A 4-foot width gives you enough space for most vegetables while keeping the center reachable. For length, 8 feet is ideal for most gardens, but adjust based on your yard. I always add 2 extra inches to each dimension to account for the thickness of the wood sides.
🪴 Step 2: Build the Corner Foundations with Cinder Blocks
Place your first cinder block at one corner of the marked area. Use a level to ensure it's perfectly plumb—this is critical for stability. I like to stack two blocks vertically at each corner to create a sturdy foundation. The blocks should sit flush with the ground or slightly elevated if your yard has drainage issues.
Repeat this process at each corner of your bed. For a 4x8-foot bed, you'll need 4 corner stacks (each with 2 blocks). If you're using half blocks for the sides, place them between the corner stacks to create a continuous edge. Space them about 12 inches apart to allow for the wood sides to sit snugly between them.
🪴 Step 3: Attach the Wood Sides to the Cinder Block Frame
Cut your 2x6 or 2x8 boards to the exact dimensions of your bed's interior (e.g., 3 feet 10 inches long for a 4-foot-wide bed, accounting for the 2-inch wood thickness). Slide the boards between the cinder blocks, ensuring they sit flush against the top of the blocks. Use deck screws or exterior-grade screws to secure the wood to the blocks.
Pre-drill holes to prevent the wood from splitting, especially if you're using untreated lumber. I like to add corner braces for extra stability—these metal brackets reinforce the connection between the wood and blocks. For a 4x8-foot bed, you'll need 4 long sides and 2 short sides, cutting each board to fit snugly between the blocks.
☀️ Step 4: Reinforce and Add Optional Supports
For added durability, especially in windy areas, drive 4x4 posts into the ground at each corner of the bed. Cut them to extend 12-18 inches above the top of the cinder blocks and secure them to the wood sides with heavy-duty brackets. This creates a frame that resists shifting over time.
If your bed is taller than 12 inches, add horizontal supports between the cinder block layers to prevent the wood from bowing outward. I use 2x4 boards screwed horizontally across the inside of the bed every 2 feet for extra reinforcement. This step is optional but highly recommended for taller beds.
🌱 Step 5: Fill and Prepare the Bed for Planting
Line the bottom of the bed with cardboard or landscape fabric to block weeds and prevent soil from leaking out. Fill the bed with a layered soil mix: start with 4-6 inches of compost or well-rotted manure at the bottom for drainage, followed by a 6-inch layer of topsoil, and top with 2-3 inches of finished compost. Mix these layers thoroughly to create a nutrient-rich planting medium.
Water the soil deeply after filling to settle it and remove air pockets. Let it drain for a day before planting. I always add a slow-release fertilizer to the top layer of soil to give plants a nutrient boost right from the start. Avoid compacting the soil—just gently press it down with your hands to create a firm but loose planting surface.
Tips & tricks for perfect raised garden beds
Building a raised bed that lasts takes attention to detail—here's how to avoid common pitfalls and create a structure that'll serve you for years.
Foundation Stability: When stacking those two blocks vertically at each corner in Step 2, don't skip the level check. Even a slight tilt now will cause your entire bed to lean over time. I've seen beds collapse because someone rushed this step—trust me, it's worth the extra 30 seconds. For extra stability, especially on sloped ground, consider adding a third block in the middle of each long side to create a continuous base.
Wood Selection: The 2x6 or 2x8 boards you choose make all the difference. Cedar or redwood naturally resist rot, but if you're using pine (which is more budget-friendly), treat it with a waterproof sealant before assembly. I always pre-drill holes before attaching the wood to the blocks—this prevents splitting and makes the screws hold better. Remember, the 3 feet 10 inches length accounts for the 2-inch wood thickness, so measure twice!
Reinforcement Strategy: Don't overlook the horizontal supports in Step 4 if your bed is taller than 12 inches. These 2x4 boards every 2 feet create a lattice that prevents the wood from bowing outward under soil weight. I've seen beds where people skipped this step—after just one season, the sides started to sag. For extra peace of mind, add corner braces even if you're not using the 4x4 posts, especially in windy areas.
Soil Layering: That 4-6 inches of compost at the bottom isn't just for drainage—it's where beneficial microbes will thrive. I like to mix in coarse sand (about 1 inch) in the bottom layer to improve drainage even more. When adding the 6-inch topsoil layer, avoid compacting it—just spread it evenly and let it settle naturally. The 2-3 inches of finished compost on top should be fluffy, not packed down like dirt.
Pro Tips for Raised Garden Bed With Cinder Blocks And Wood
- Building a raised bed that lasts takes attention to detail—here's how to avoid common pitfalls and create a structure...
- Foundation Stability: When stacking those two blocks vertically at each corner in Step 2, don't skip the level check....
- Wood Selection: The 2x6 or 2x8 boards you choose make all the difference. Cedar or redwood naturally resist rot, but ...
Frequently asked questions
Got questions about building and maintaining your raised garden bed with cinder blocks and wood? You’re not alone! Here are answers to the most common concerns—so you can garden with confidence.
Can I use regular cinder blocks or do I need special ones?
Standard cinder blocks (like _CMU_ or concrete blocks) work great, but avoid lightweight "hollow" blocks—they lack stability. For extra durability, opt for solid concrete blocks or interlocking pavers. If using cinder blocks, ensure they’re clean and free of debris before stacking to prevent mold or pests.
How tall should my raised bed be for cinder blocks and wood?
Aim for 12–18 inches tall—this height improves drainage, reduces bending, and works for most plants. For wheelchair accessibility, go up to 30–36 inches. Pro tip: Add a 2-inch lip (using extra wood or blocks) to keep soil in place.
Will wood rot if I use cinder blocks as the base?
Not if you prevent moisture buildup! Line the bottom with landscape fabric to block soil contact, and use rot-resistant wood like cedar, redwood, or pressure-treated lumber. Avoid placing wood directly on bare ground—add a gravel or pavers layer first for airflow.
What’s the best way to fill a cinder block-raised bed?
Layer your bed in thirds for optimal growth:
- Bottom (1/3): Coarse material (gravel, broken bricks, or bark chips) for drainage.
- Middle (1/3): A mix of compost and topsoil (50/50 ratio) for nutrients.
- Top (1/3): Finished compost or aged manure to feed plants.
For heavy feeders (like tomatoes), add a slow-release fertilizer to the top layer.
How do I fix a wobbly or uneven cinder block bed?
Start by checking the base—uneven ground or shifting blocks cause instability. Solutions:
- Level the ground beneath blocks with a shovel or tamper.
- Add gravel under blocks for support if the soil is soft.
- Reinforce corners with rebar or extra wood braces if blocks shift.
For wood frames, tighten screws and add corner brackets if needed.
Wrapping up and next steps
Building a raised garden bed with cinder blocks and wood is a game-changer for gardeners—it’s sturdy, customizable, and perfect for extending your growing season! 🌱 Whether you’re a beginner or a seasoned pro, this setup offers durability, easy maintenance, and adaptability for any plant.
Now that you’ve got the know-how, it’s time to roll up your sleeves and create your own thriving garden oasis.
Ready to start? Sketch your design, gather your materials, and begin stacking those blocks—your future harvests will thank you! 🌿