
How To
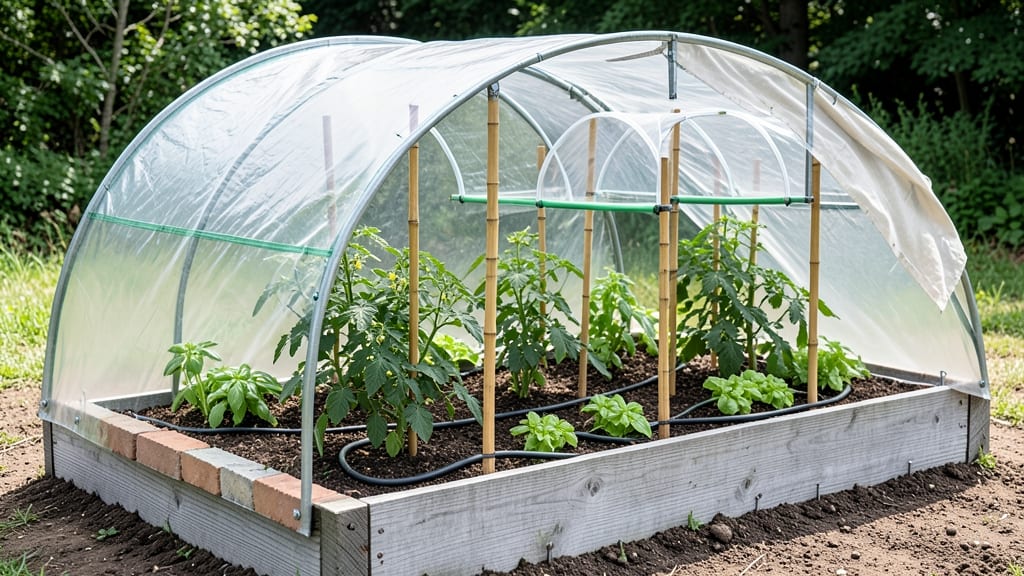
A raised bed hoop house turns your garden into a climate-controlled sanctuary where tomatoes thrive in winter and greens grow through snow. 🌱 I built mine after watching my spring starts wilt in chilly mornings—now I harvest fresh herbs in December and extend my growing season by 4+ months without fancy equipment.
The beauty of this DIY greenhouse is its simplicity: lightweight PVC pipes, sturdy bed frames, and clear plastic sheeting create a low-cost, high-impact solution. No permanent foundation needed—just assemble, anchor, and adjust the angle for sun exposure. Even small spaces work, making it perfect for balconies, patios, or backyard corners.
You’ll protect plants from frost, wind, and pests while keeping costs under $100 for basic materials. The first year, my kale stayed crisp through January, and my peppers produced again in October. The key? Proper ventilation and strategic placement to maximize sunlight without overheating.
Works for any garden size—from a single 4x8-foot bed to a multi-hoop greenhouse for larger plots. Whether you’re a first-time builder or adding to your existing setup, this project delivers foolproof results that keep your garden productive year-round.
📚 In This Guide
- What you need
- Instructions
- Tips and common mistakes
- Wrapping up and next steps
What you need
- ● Hoops: 1/2" to 5/8" PVC pipes (or galvanized steel pipes) – 10–12 hoops per 4'x8' bed, cut to ~5–6 ft tall.
- ● Base frame: 2x4 lumber or cedar planks – for the raised bed perimeter (adjust to your bed size).
- ● Plastic sheeting: 4–6 mil UV-resistant greenhouse plastic – enough to cover the hoops with overlap (e.g., 10'x20' for a 4'x8' bed).
- ● Bungee cords or zip ties: – to secure plastic to hoops (10–15 cords/ties).
- ○ Ground stakes or sandbags: – to weigh down the edges (optional but helpful for windy areas).
- ● Measuring tape & pencil
- ● Circular saw or miter saw (for cutting PVC/lumber)
- ● Drill (with screws for bed frame)
- ● Level (to ensure even hoops)
- ● Scissors or utility knife (for plastic)
- ● Thermometer/hygrometer – to monitor indoor climate.
- ● Ventilation kit – for airflow (e.g., roll-up sides or a small fan).
- ● Reflective mulch or row covers – for extra warmth.
- ● Drip irrigation kit – for automated watering.
Step-by-Step instructions for building a DIY raised bed hoop house
Here's how to create a sturdy, low-cost greenhouse that extends your growing season without breaking the bank.
🪴 Step 1: Design and Measure Your Hoop House Structure
Start by measuring your raised bed dimensions—hoop houses work best when the frame matches the bed's footprint. For a 4-foot by 8-foot bed, you'll need 5-foot tall hoops spaced 2 feet apart along the length. Sketch a simple plan showing hoop placement and how the plastic will drape over them. I like to use PVC pipes (1-inch diameter) for hoops because they're lightweight, affordable, and easy to cut to size.
Mark the center of each hoop location on the bed's long sides using stakes and string. This ensures your hoops stay perfectly vertical and evenly spaced. Real talk: if hoops lean, the plastic won't sit flat, and you'll get gaps where cold air sneaks in. Double-check measurements before cutting any materials—once you start assembling, there's no going back without visible seams.
☀️ Step 2: Assemble and Secure the Hoop Frame
Cut your PVC pipes to 5-foot lengths (or adjust based on your bed height + desired clearance). Bend each pipe into a U-shape using a PVC bending jig or by carefully heating the pipe with a heat gun—never force-bend cold PVC, or it'll crack. Insert the hoops into the ground at your marked centers, burying 6 inches for stability. You'll need 20 hoops total for a 4x8 bed (5 along each long side).
Connect the hoops at the top with horizontal PVC pipes (also 1-inch diameter) to create a ridgepole. Secure them with PVC cement or zip ties at each hoop intersection. For extra wind resistance, add diagonal support wires (like galvanized fence wire) from the hoop bases to the ridgepole. This creates a triangular framework that won't collapse under snow or strong winds. Test stability by gently pushing each hoop—it should barely budge.
💧 Step 3: Cover with Clear Plastic Sheeting
Use 6-mil clear plastic sheeting (the thickest you can find—it lasts longer and blocks more UV). Lay the plastic over the frame, starting at one end and pulling it taut as you go. Secure it to the base with landscape staples (not nails—they tear the plastic). At the ridgepole, overlap the plastic by 6 inches and staple it down. For ventilation, leave 12-inch gaps at both ends of the ridgepole—this prevents overheating while still trapping warmth.
Here's the thing—plastic stretches over time, so add weighted edges (like bricks or sandbags) along the sides to keep it snug against the ground. If you live in a windy area, bury the edges 2 inches deep to prevent flapping. I also recommend UV-resistant plastic if you're using this year-round; regular plastic degrades in sunlight and turns brittle within a season.
✂️ Step 4: Add Ventilation and Doors for Climate Control
Cut 2-foot by 2-foot panels from the plastic sheeting to create removable vents. Install zipper tracks along the sides of the hoop house so you can roll up the plastic for airflow when temperatures rise above 85°F. For a door, frame a 2-foot by 3-foot opening with wooden battens, then cover it with clear plastic secured with Velcro strips—this lets you access plants without losing heat.
Don’t skip the ventilation. I’ve seen hoop houses turn into saunas overnight, with plants wilting from heat stress. On sunny days, crack the vents by mid-morning and close them by late afternoon to retain warmth. If your hoop house gets foggy inside, that’s a good sign—it’s trapping humidity, which is exactly what you want for plant safety during cold snaps.
🌿 Step 5: Test and Adjust for Seasonal Use
Before planting, conduct a 24-hour stress test by sealing the hoop house completely (except vents) and checking the internal temperature with a thermometer. On a 40°F night, your hoop house should stay above 50°F—if not, add insulation like bubble wrap inside the plastic or straw bales along the base. For winter, I double the plastic layer during sub-freezing temps to create an extra barrier against cold air.
Watch how plants respond in the first few weeks. If leaves yellow or growth stalls, it’s usually a ventilation or watering issue—hoop houses trap moisture, so water less frequently but deeply. And here’s a pro tip: rotate crops every season to prevent soil depletion. The raised bed’s soil warms faster in spring, so start heat-loving plants like peppers and tomatoes 2-3 weeks earlier than your usual outdoor schedule.
Tips & tricks for building a sturdy DIY hoop house
A few game-changing strategies that'll keep your greenhouse standing strong through wind, snow, and everything in between.
Precision in Step 1: When marking hoop locations in Step 1, use a laser level or string line to ensure perfect vertical alignment. I learned this the hard way after building a crooked frame that let in drafts—trust me, it's worth the extra 10 minutes. The 2-foot spacing between hoops is ideal, but if you're working with a wider bed, reduce spacing to 18 inches for better plastic tension. Double-check your 5-foot height before cutting PVC; even a 6-inch difference affects how well the plastic drapes.
Bending PVC Safely: For Step 2, never bend PVC by hand—it cracks instantly. Instead, use a PVC bending jig or heat the pipe with a heat gun while rotating it slowly. I wrap mine in wet newspaper first to protect against burns, then bend it over a sturdy form. The U-shape should be symmetrical; test each hoop by placing it on a level surface before installing. Burying 6 inches of each hoop stabilizes the structure, but in loose soil, add concrete footings for extra security.
Plastic Installation Secrets: In Step 3, the 6-inch overlap at the ridgepole is crucial for waterproofing. Use galvanized staples (not plastic ones) to secure the edges, and always pull the plastic taut before stapling—wrinkles create weak spots where wind can tear it. For ventilation, consider adding automatic vent openers that trigger at 85°F—they're a small investment that prevents heat buildup. And here's what nobody tells you: UV-resistant plastic costs more upfront but lasts 3-4 years instead of 1, saving you money long-term.
Seasonal Adjustments: The 24-hour stress test in Step 5 is non-negotiable. If your hoop house drops below 50°F on a 40°F night, add black plastic mulch inside the frame—it absorbs heat during the day and radiates it back at night. For winter use, double the plastic layer with bubble wrap sandwiched between sheets; this adds 10-15°F of extra warmth. And pro tip: rotate crops annually to prevent soil-borne diseases from building up in the raised bed.
Pro Tips for Raised Bed Hoop House
- A few game-changing strategies that'll keep your greenhouse standing strong through wind, snow, and everything in bet...
- Precision in Step 1: When marking hoop locations in Step 1, use a laser level or string line to ensure perfect vertic...
- Bending PVC Safely: For Step 2, never bend PVC by hand—it cracks instantly. Instead, use a PVC bending jig or heat th...
Frequently asked questions
Got questions about building and using a raised bed hoop house? You’re not alone! Here are some of the most common queries—and their straightforward answers—to help you get started with confidence.
What’s the best time of year to build a hoop house?
A hoop house can be built year-round, but timing depends on your goals. For spring/summer use, construct it in early spring before planting. For winter extension, build in late summer or fall to allow plants to acclimate. Avoid extreme weather—wait for mild, dry days to assemble for easier work and durability.
How cold can a hoop house handle?
Most DIY hoop houses with clear plastic or polycarbonate can handle temperatures down to 15–20°F (-9 to -6°C), but performance varies. Add row covers or insulation for colder climates. Monitor humidity—condensation can freeze, so ensure proper ventilation. For sub-zero temps, consider a double-layered cover or a small heater (safely used!).
Are hoop houses worth the cost compared to a full greenhouse?
Hoop houses are 70–90% cheaper than traditional greenhouses while offering similar benefits. They’re ideal for season extension, pest control, and microclimate creation without the high upfront cost. Perfect for small gardens, raised beds, or budget-conscious growers. Think of them as a low-cost, high-reward upgrade to your growing space.
How do I keep pests out of my hoop house?
Pests love hoop houses too! Start by sealing gaps with weatherstripping or mesh. Use floating row covers for delicate plants. Introduce beneficial insects (like ladybugs) or companion plants (e.g., marigolds). For soil-borne pests, sterilize beds with solarization or compost. Regularly inspect leaves and remove infested plants outside the hoop house.
What’s the easiest material for a DIY hoop house frame?
For beginners, PVC pipes or galvanized steel hoops are the simplest and most affordable. PVC is lightweight, easy to cut, and resists rust. Steel hoops are sturdier for windy areas but require more effort to bend. Avoid untreated wood—it rots quickly. Bendable rebar is another budget-friendly option if you have access to it.
What do I do if my hoop house collapses in wind or snow?
First, check for loose fittings or weak spots—tighten connections and reinforce with stakes or guy wires. For snow, shake it off gently or use a broom to prevent weight buildup. If damage occurs, patch holes with duct tape or plastic sheeting temporarily. For severe issues, reassess your hoop spacing (aim for 3–4 feet apart) and consider arching the hoops for better snow shedding.
Wrapping up and next steps
A raised bed hoop house is your ticket to extending the growing season, protecting plants from harsh weather, and boosting yields—all while keeping costs low and flexibility high.
Whether you're a seasoned gardener or just starting, this DIY project empowers you to take control of your harvest with minimal effort and maximum reward.
Ready to green-thumb up your gardening game? Start small—build one hoop house for your most precious plants, then expand as your confidence (and garden!) grows. Happy building, and may your plants thrive year-round! 🌱✨